Click HERE to return to the contents page
[Time: 26:46 min.] [Time: 26:46 min.]The Customer pay their Debts, that is open A/R Invoices, according to agreed Payment Terms: Cash Basic, Installments, Net 30, etc.
Maria, the accountant at company, deals with Incoming Payments every afternoon: She views the company bank account on-line to see the amount of bank
Let us look at a typical manual payment process: The customer pay their debits, that is open A/R Invoices, according to agreed Payment Term: Cash Basic, Installments, Net 30, etc.
Accountant views the company bank account on-line to see the amount of bank transfer Incoming Payments received from customers. In SAP Business One, she check the credit cards accounts (Visa and Master Card) to see the amount of credit card Incoming Payments issued in the store point of sale and in the customer service center during the day. Then, Maria enters a Credit Card Deposit in SAP Business One to record the payment Visa and Master Card transferred to the company bank account.
... we focus on the manual payments process. Remember, that you have the Payment Wizard and the Bank Statements Process options that enable you to create Incoming an Outgoing Payments automatically and semi-automatically, depending on your localization.
Incoming Payments - Check, Credit Card and Cash Payment Means
When you issue a full Incoming Payment the Open Invoice on the [411] Customer Account is Closed.
You can also issue an Incoming Payment is not based on an invoice, for example, a Payment Account.
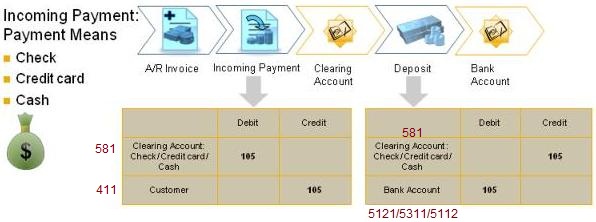
Cash, Check and Credit card payments are posted to a [581] Clearing or temporary account. Note that term "clearing" is used in the US Localization. In other localizations the term could be: "Temporary Account" or "Suspense Account".
The [581] Clearing Accounts must be predefined during setup.
When a customer pays using cash, check or credit card, you enter an Incoming Payment that generates the following automatic Journal Entry. Debit to a [581] Clearing Account - [5311] Cash on Hand / [5121] Credit Card / [5112] Checks Received. Credit to [411] Customer Account.
External tools like point of sale system an authorization of credit card transactions can be integrated into standard process.
A Deposit document must be processed in Order to transfer the funds from the [581] Clearing Account to the [5121] House Bank account and clear the [581] Clearing Account.
Incoming Payments - Bank Transfer Payment Means (same in Romanian Localization)
![]()
When a Customer pays using the Bank Transfer payment mean the transaction does not involve a [581] Clearing Account. The customer transfers the Payment directly to your House bank.
... the Debit to the [5121] House Bank Account, and the Credit to the [411] Customer Account.
Structure of a payment Document
The screens for Incoming and Outgoing Payments are almost
identical. The window is divided into following parts:
1. The document header area (on the top).
2. The area for selecting Open Invoices, Credit Memos and Journal Entries,
and for assigning the payment amounts (in the middle).
3. The area for entering remarks an displaying totals (at the bottom).
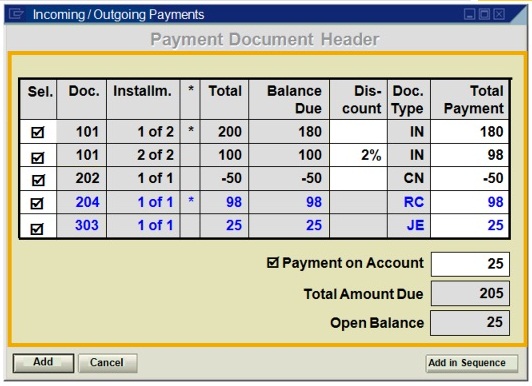
IN -
A/R Invoice
RC -
Incoming Payment
CN - A/R Credit Memo
JE - Journal Entry
In the middle area, you select open transactions for payment from the table by using the checkbox in the "Selected" column. The system offers you tools to quickly indentify the nature of the documents displayed and to aid in your selection: An asterisk (*) after invoice date indicates that the invoice is currently due. That is, the invoice due date is earlier than or equal to the current date.
The document type column tells you the origin of each line.
Using Form Settings, you can choose to display the BP Reference Number indicator in the table. This allows you to base the payment on the vendor's invoice number rather than you own internal document number when you issue an Outgoing Payment. Also in Form Settings, you can choose whether to have the system display all transactions in the table or to restrict the display to invoices and Credit Memos.
After you determine the payment amount, you must specify the payment means. You can select of the following payment means: Check, Bank Transfer, Credit Cart, or Cash. In most cases, the payer pays the amount in full using one means of payment. However, it is possible to split the amount among several means of payment. The system takes the details on the means of payment for Incoming Payment from the customer master record.
When you post a payment, the system reconciles the payment with the selected invoices, and closes the transactions. If the payment was posted as a Payment on Account, the invoices and the payment stay open. If a partial payment was made, the system adjust the Balance Due appropriately.

If you take cash from your cash register or checks from you check drawer and bring them to your bank, you can use the Deposit transactions to post this transfer.
The Incoming Payment credits the [411] Customer Account and debits the [5311] Cash on Hand Account.
When the deposit is made, the Cash Deposit is credited and the [5121] Bank Account is debited.
A deposit of check is similar. The Incoming Payment credits the [411] Customer Account and debits the [5112] checks received account. When the deposit is made, the [5112] Check Received Account is credited and [5121] Bank Account is debited.
Demo - Incoming Payment and Deposit
Let us look at how to record an Incoming Payment and Deposit.
We will create an Incoming Payment to document a customer paying us in Cash. I will then Deposit the received cash to the company bank account.
The window for Incoming Payment and Outgoing Payment are almost identical.
Banking > Incoming Payment > Incoming Payment
In the document header, I choose the customer who is paying. Then system then copies the Name and the standard Contact Person from the Business Partner Master Record.
The default value for Business Partner for Incoming Payments is Customer and for Outgoing Payments, Vendor.
I can create both Incoming an Outgoing payments for Customers, Vendors, or Accounts.
I will choose Account if the business gets payments from an insurance company or social security.
For Incoming Payments, the system copies the Bill-to address from the Business Partner Master record into the address fields in the document header. Note that I can assign payment to a project.
In the table area the system displays the open invoices and Credit Memos for this customer with the installment number.
If select BP Reference Number indicator in the Form Settings, the system displays the customer/vendor reference numbers instead of the invoice number. This option is not important when creating Incoming Payments but is very helpful when I enter an Outgoing Payment and base it on the vendor's invoice number I received from the vendor.
The Document type field tells me the origin of the line - IN for A/R Invoice, CN for A/R Credit Memos.
An account may contain postings that are not invoices or Credit Memos, for example, Journal Entries or Payments or account.
The system displays these transactions as blue lines below the Invoices and Credit Memos.
I can decide whether to display these transactions or not. If I go to the Form Settings window, I see the option "Display All Transactions". If I deselect the indicator, the system will exclude transactions that are not Invoices or Credit Memos.
An asterisk (*) after the invoice data indicates that the invoice is due. That is, the invoice due date is earlier than or equal to the current date.
The system displays the invoice amount and balance due, meaning, invoice amount less any partial payments or Credit Memos, for each invoice. If cash discount applies, according to the Business Partner payment terms, the system deducts the cash discount from the due balance and proposes the final amount for payment in the Total Payment field.
I have just received a payment from the customer for Invoice no XXX. I select the open invoice for payment by choosing the checkbox for the line. I can also enter a smaller amount as partial payment by changing the Total Payment amount column. In our case the customer pays the entire invoice amount so we leave the Total Payment amount as is.
The system displays the full payment amount - sum of all selected lines in the table plus any manual entered amount, in the Total Amount Due field.
After determine the payment amount, I must specify the payment means for the payment (choose the Payment Means icon). Depending on how the customer pays, I select one of the following payment means: Check, Bank Transfer, Credit Card, and Cash. In this case the customer pays Cash.
Note that the default accounts for incoming checks and cash payment means are defined in the G/L Account Determination window.
Administration > Setup > Financials > G/L Account Determination > Sales tab > General tab: focus on the "Checks Received" and "Cash on Hand" fields.
For Incoming credit card payment, the default account is defined on the credit card setup window.
I can also define a default account for outgoing bank transfer payment means.
On the same window choose the Purchase tab > Bank Transfer field.
Since the customer pays the entire amount in cash I copy the Total amount Due from the Incoming Payment to the Total field in the Payment Means window by choosing Ctrl + B or right-click the mouse and choose Copy Balance Due. In most cases, the pays the amount in full using one means of payment.
However, it is possible to split the amount among several means of payment. The system takes the details on the means of payment for Incoming Payment from the customer master records.
Next, I choose OK in the Payment Means window and then add to add the payment.
Let us look at the automatic Journal Entry created by the Incoming Payment.
The default [5311] Cash Account was debited and the paying customer was credited. When I post a payment, the system also reconciles the payment with the selected invoices, and closes the transactions.
In the [411] Customer Account balances window the invoice and the payment do not appear. This is because their transactions are fully reconciled and Closed. Only when I uncheck the "Display Unreconciled Trans. Only" box, do the transactions appear.
To enter payments that cannot be assign to an invoice I select the payment on Account indicator. The system then lets me enter the payment amount manually. For example, when I get a payment in advance, that is a Payment on Account. In this case after I add the payment, the invoices and the payment stay open. In this case I would need to manually reconcile the two transactions.
Once a day I take cash from our cash register and checks from the check drawer and deposit them to the [5121] Company Bank Account.
Let me show you how I register the cash deposit in SAP Business One.
Banking > Deposits > Deposits and select the Cash tab.
In the G/L Account field I see the default [5311] Cash on Hand that represents our Cash register. This account is defined in the G/L Account Determination window. The system displays the account balance in the Balance field.
I enter the amount that I want to deposit into Amount filed. I enter the G/L Account Number that represents our Bank Account into the [5311] Bank Account filed.
Note: if I try to deposit an amount greater than the Account balance, the system will block me.
In the Bank Reference field I can enter the deposit number as was registered in the Company Bank. I can then use this information in external reconciliation I do with the bank statement. Finally, I choose Add to add the deposit.
Let us look at the automatic Journal Entry. The [5311] Cash on Hand is created and the [5121] Bank Account is debited.
In some countries, such as the United States, customers may choose to skip the deposit document and have the found immediately recorded to the House Bank.
Therefore, they use the [5121] House Bank Account in the Incoming Payment instead of the [581] Clearing Account Cash.
Although the amount still appears in the deposit window, accounting wise, no additional deposit needs to be created.
The Payment Process in SAP Business One - Purchasing
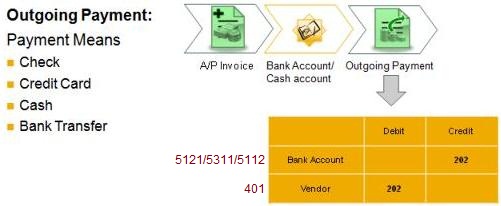
Working with Outgoing Payment is similar to Incoming Payments. Except of course in the fact that you pay money instead of receive money.
When you create an Outgoing Payment: There is a debit to [401] Vendor Account, and a credit [5121] Bank Account.
Unlike, Incoming Payments, typically the process does not involve clearing or temporary accounts for credit card, checks and bank transfers. Instead, the credit posting is done directly on the [5121] Bank Account.
If you wish to use a Clearing or Temporary Account, an Interim Account can be manually inserted in the G/L Account filed in the Payment Means. Then, when the payment is reduced from the bank, an manual entry should be created to debit the interim account and credt the [5121] Bank Account.
Additionally, the Payment wizard can be used to automatically generate payments against a [581] Clearing Account.
If you want to set the system to use [581] Clearing Account automatically in your localization, you can use the Bank Statement Processing functionality which can be set up to automatically post transfer between clearing an Bank Accounts. The same is true for the Cash and Bank Add-On which is relevant for some localizations.
Note that Cash and Bank is not available in the Bank Statement Processing functionality has been switched on.
The Payment Process in SAP Business One - Payment Wizard
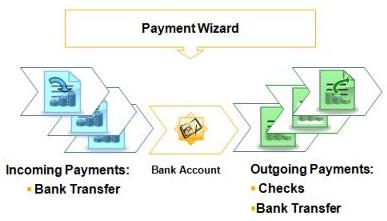
The Payment wizard enables you to create Outgoing and Incoming Payment in batch for bank transfer, checks and bills of exchange.
The payments are created according to your selection criteria and Payment Methods.
The Payment Wizard creates: Incoming Bank transfer payments, and Outgoing checks and Bank transfer payments. Payment Wizard runs cover "A/P and A/R documents transactions" that are not fully paid, credited, or reconciled.
The runs also cover payments on account that are not allocated or reconciled to specific transactions.
If the created payments are bank transfer payments or direct debit payments, the Payment wizard creates the payment files in the correct country-specific format.
Use the Bank Statement Processing with Bank Transaction Handling Facility (BTHF), the payment engine or third-party Add-On to create the correct files for the bank.
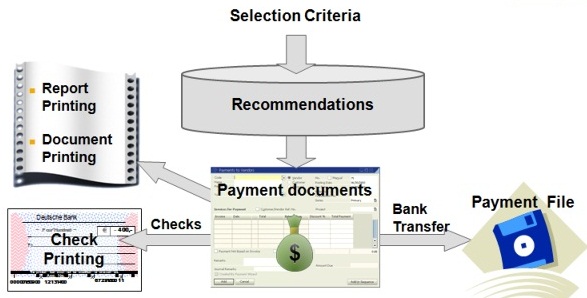
The Payment Wizard - Select Criteria

In the Payment wizard payments are created according to your selection criteria and Payment Methods.
This graphic shows the steps in the Payment Wizard.
First, each run of the payment wizard is identified by payment run name and the date of the payment run. Then you specify several selection criteria as follows: General parameters, such as the date of the next planned payment run, type (Outgoing or Incoming), payment means (check or bank transfer), and the document series, which are used to create the payment document.
The Business Partners that the system checks for invoices due. Selection criteria for the documents that the system includes, such as date ranges. And lastly, the Payment Methods to be used in the payment run.
Based on these selection criteria the system creates a recommendation report or a list of suggested payments. You can accept or reject recommendations. You can save the recommendations and proceed at later date, or you can execute the payments.
The button Non-Included Transactions creates a list of all open items that could not be included in the payments run.
It is very important to define default values for the payment wizard in the Administration module. This data is used by default in every payment run.
The Payment Wizard - Payments Creation
When you execute the payments, the system automatically creates the payment documents for your accepted recommendations.
A Payment usually consolidates invoices for a Business Partner, unless you specify otherwise in the Business Partner Master. For example, you can choose "single payment" to create one payment for each invoice for that Business Partner.
If the created payments are bank transfer payments or direct debit payments, the Payment wizard creates the payment files in the correct country-specific format. If you need to create or adapt file format you can use the electronic File Manager.
This SAP Business One Add-On ia a graphical tool that lets you define and modify incoming bank statement formats.
If the created payments are check payments, they can print directly form the system. After the check is printed, the system assigns the check numbers. Once the process is complete, use the Check number confirmation option in the Banking module to confirm the number assigned.
Payment Methods as Main Control Instrument
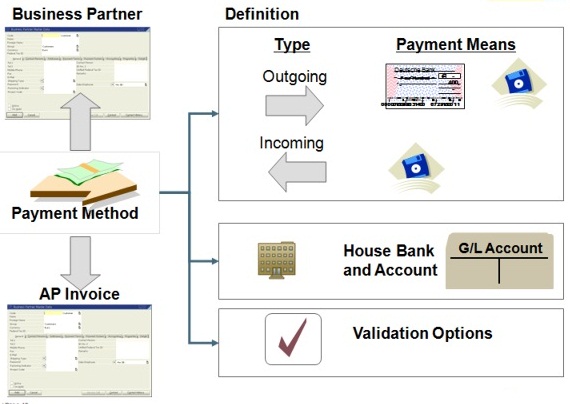
With the Payment Method, you control the entire payment
process. In the definition of a Payment Method, you define the following:
First, the type of payment and payment means: for Outgoing Payments: check or
bank transfer, for incoming: only bank transfer.
Second, the House Bank and the bank account that should usually receive or issue the payment made with this Payment Method.
Third, validation checks that the system is to carry out before using this
Payment Method, as well as amount restrictions.
And last, posting in relation to G/L Interim Accounts.
In master records of the Business Partners, you must specify which Payment Method you want to use with each Business Partner.
You can define a default Payment Method to assign to new
Business Partners' creation in:
Administration > System Initialization > General Settings > on the BP tab.
From the Payment Method listed in the Business Partners Master Records, the system automatically chooses one, based on the settings in the Payment run.
If you want to use a specific Payment Method for certain invoice, you can also directly enter the Payment Method in the invoice itself.
We will create an Outgoing Payment with a Bank transfer using the payment wizard.
We will review the Payment wizard process that enables us to create payments in batches for. Outgoing checks and bank transfer payments and for incoming bank transfer payments.
I will show you how I create an Outgoing Payment in order to pay the vendor liabilities by bank transfer.
Once a week I run the payment wizard.
Banking > Payment Wizard. I choose Next and the Start Payment Run. I select Outgoing, Bank Transfer and Next.
Usually I run the wizard for a range of vendors to create a batch of payments for the coming week but in this example I only select the vendor V10000.
When browsing to the Master Data we see that Outgoing BT is set as the default Payment Method for this vendor. I choose Next.
In the Due Date To filed I enter today's date plus fortnight and I choose Next. I select the Payment Method Outgoing BP and choose Next. The system display the recommendation report.
I select the payments that I want to generate and choose Next. I decide to accept the system recommendation and choose Execute and then Next.
A window appears that states that the Payment Wizard has been executed successfully.
Let us check if the system has correctly created the payment documents.
Banking > Outgoing Payments > Outgoing Payments and navigate to the last data record.
Note that the indicator "Created by Payment wizard is set in the Outgoing payment document.